周边工具产品实践
一文了解 NebulaGraph 上的 Spark 项目
最近我试着搭建了方便大家一键试玩的 NebulaGraph 中的 Spark 相关的项目,今天就把它们整理成文分享给大家。而且,我趟出来了 PySpark 下的 Nebula Spark Connector 的使用方式,后边也会一并贡献到文档里。
NebulaGraph 的三个 Spark 子项目
我曾经围绕 NebulaGraph 的所有数据导入方法画过一个草图,其中已经包含了 Spark Connector,Nebula Exchange 的简单介绍。在这篇文章中我将它们和另外的 Nebula Algorithm 进行稍微深入的探讨。
注:这篇文档 也很清楚为我们列举了不同导入工具的选择。
TL;DR
- Nebula Spark Connector 是一个 Spark Lib,它能让 Spark 应用程序能够以
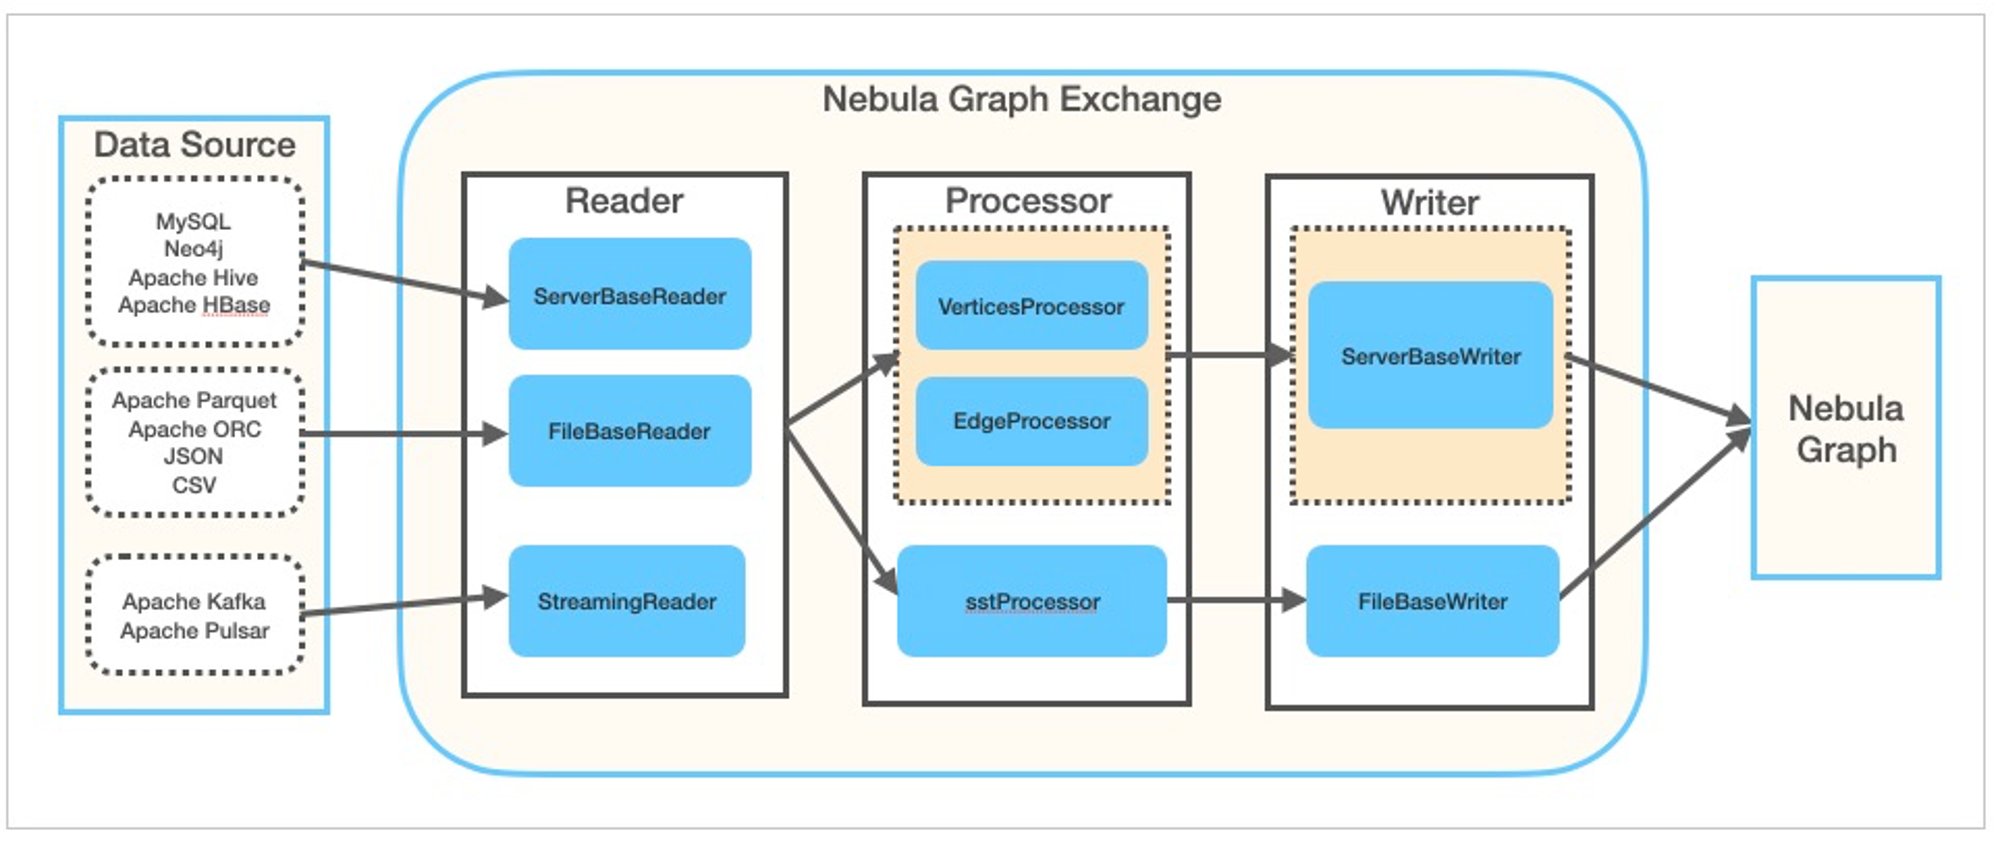
dataframe的形式从 NebulaGraph 中读取和写入图数据。 - Nebula Exchange 建立在 Nebula Spark Connector 之上,作为一个 Spark Lib 同时可以直接被 Spark 提交 JAR 包执行的应用程序,它的设计目标是和 NebulaGraph 交换不同的数据源(对于开源版本,它是单向的:写入,而对于企业版本,它是双向的)。Nebula Exchange 支持的很多不同类型的数据源如:MySQL、Neo4j、PostgreSQL、ClickHouse、Hive 等。除了直接写入 NebulaGraph,它还可以选择生成 SST 文件,并将其注入 NebulaGraph,以便使用 NebulaGraph 集群之外算力帮助排序底层。
- Nebula Algorithm,建立在 Nebula Spark Connector 和 GraphX 之上,也是一个Spark Lib 和 Spark 上的应用程序,它用来在 NebulaGraph 的图上运行常用的图算法(pagerank,LPA等)。
Nebula Spark Connector
- 代码:https://github.com/vesoft-inc/nebula-spark-connector
- 文档:https://docs.nebula-graph.io/3.1.0/nebula-spark-connector/
- JAR 包:https://repo1.maven.org/maven2/com/vesoft/nebula-spark-connector/
- 代码例子:example
NebulaGraph Spark Reader
为了从 NebulaGraph 中读取数据,比如读 vertex,Nebula Spark Connector 将扫描所有带有给定 TAG 的 Nebula StorageD,比如这样表示扫描 player 这个 TAG :withLabel("player"),我们还可以指定 vertex 的属性:withReturnCols(List("name", "age"))。
指定好所有的读 TAG 相关的配置之后,调用 spark.read.nebula.loadVerticesToDF 返回得到的就是扫描 NebulaGraph 之后转换为 Dataframe 的图数据,像这样:
  def readVertex(spark: SparkSession): Unit = {
    LOG.info("start to read nebula vertices")
    val config =
      NebulaConnectionConfig
        .builder()
        .withMetaAddress("metad0:9559,metad1:9559,metad2:9559")
        .withConenctionRetry(2)
        .build()
    val nebulaReadVertexConfig: ReadNebulaConfig = ReadNebulaConfig
      .builder()
      .withSpace("basketballplayer")
      .withLabel("player")
      .withNoColumn(false)
      .withReturnCols(List("name", "age"))
      .withLimit(10)
      .withPartitionNum(10)
      .build()
    val vertex = spark.read.nebula(config, nebulaReadVertexConfig).loadVerticesToDF()
    vertex.printSchema()
    vertex.show(20)
    println("vertex count: " + vertex.count())
  }
写入的例子我这里不列出,不过,前边给出的代码示例的链接里是有更详细的例子,这里值得一提的是,Spark Connector 读数据为了满足图分析、图计算的大量数据场景,和大部分其他客户端非常不同,它直接绕过了 GraphD,通过扫描 MetaD 和 StorageD 获得数据,但是写入的情况则是通过 GraphD 发起 nGQL DML 语句写入的。
接下来我们来做一个上手练习吧。
上手 Nebula Spark Connector
先决条件:假设下面的程序是在一台有互联网连接的 Linux 机器上运行的,最好是预装了 Docker 和 Docker-Compose。
拉起环境
首先,让我们用 Nebula-Up 部署基于容器的 NebulaGraph Core v3、Nebula Studio、Nebula Console 和 Spark、Hadoop 环境,如果还没安装好它也会尝试为我们安装 Docker 和 Docker-Compose。
# Install Core with Spark Connector, Nebula Algorithm, Nebula Exchange
curl -fsSL nebula-up.siwei.io/all-in-one.sh | bash -s -- v3 spark
你知道吗 Nebula-UP 可以一键装更多东西,如果你的环境配置大一点(比如 8 GB RAM)
curl -fsSL nebula-up.siwei.io/all-in-one.sh | bash可以装更多东西,但是请注意 Nebula-UP 不是为生产环境准备的。
上述边脚本执行后,让我们用 Nebula-Console(NebulaGraph 的命令行客户端)来连接它。
# Connect to nebula with console
~/.nebula-up/console.sh
# Execute any queryies like
~/.nebula-up/console.sh -e "SHOW HOSTS"
加载一份数据进去,并执行一个图查询:
# Load the sample dataset
~/.nebula-up/load-basketballplayer-dataset.sh
# 等一分钟左右

# Make a Graph Query the sample dataset
~/.nebula-up/console.sh -e 'USE basketballplayer; FIND ALL PATH FROM "player100" TO "team204" OVER * WHERE follow.degree is EMPTY or follow.degree >=0 YIELD path AS p;'
进入 Spark 环境
执行下面这一行,我们就可以进入到 Spark 环境:
docker exec -it spark_master_1 bash
如果我们想执行编译,可以在里边安装 mvn:
docker exec -it spark_master_1 bash
# in the container shell

export MAVEN_VERSION=3.5.4
export MAVEN_HOME=/usr/lib/mvn
export PATH=$MAVEN_HOME/bin:$PATH

wget http://archive.apache.org/dist/maven/maven-3/$MAVEN_VERSION/binaries/apache-maven-$MAVEN_VERSION-bin.tar.gz && \
  tar -zxvf apache-maven-$MAVEN_VERSION-bin.tar.gz && \
  rm apache-maven-$MAVEN_VERSION-bin.tar.gz && \
  mv apache-maven-$MAVEN_VERSION /usr/lib/mvn
跑 Spark Connector 的例子
选项 1(推荐):通过 PySpark
- 进入 PySpark Shell
~/.nebula-up/nebula-pyspark.sh
- 调用 Nebula Spark Reader
# call Nebula Spark Connector Reader
df = spark.read.format(
  "com.vesoft.nebula.connector.NebulaDataSource").option(
    "type", "vertex").option(
    "spaceName", "basketballplayer").option(
    "label", "player").option(
    "returnCols", "name,age").option(
    "metaAddress", "metad0:9559").option(
    "partitionNumber", 1).load()

# show the dataframe with limit of 2
df.show(n=2)
- 返回结果例子
      ____              __
     / __/__  ___ _____/ /__
    _\ \/ _ \/ _ `/ __/  '_/
   /__ / .__/\_,_/_/ /_/\_\   version 2.4.5
      /_/

Using Python version 2.7.16 (default, Jan 14 2020 07:22:06)
SparkSession available as 'spark'.
>>> df = spark.read.format(
...   "com.vesoft.nebula.connector.NebulaDataSource").option(
...     "type", "vertex").option(
...     "spaceName", "basketballplayer").option(
...     "label", "player").option(
...     "returnCols", "name,age").option(
...     "metaAddress", "metad0:9559").option(
...     "partitionNumber", 1).load()
>>> df.show(n=2)
+---------+--------------+---+
|_vertexId|          name|age|
+---------+--------------+---+
|player105|   Danny Green| 31|
|player109|Tiago Splitter| 34|
+---------+--------------+---+
only showing top 2 rows
选项 2:编译、提交示例 JAR 包
- 先克隆 Spark Connector 和它示例代码的代码仓库,然后编译:
注意,我们使用了 master 分支,因为当下 master 分支是兼容 3.x 的,一定要保证 spark connector 和数据库内核版本是匹配的,版本对应关系参考代码仓库的
README.md。
cd ~/.nebula-up/nebula-up/spark
git clone https://github.com/vesoft-inc/nebula-spark-connector.git

docker exec -it spark_master_1 bash
cd /root/nebula-spark-connector
- 替换示例项目的代码
echo > example/src/main/scala/com/vesoft/nebula/examples/connector/NebulaSparkReaderExample.scala

vi example/src/main/scala/com/vesoft/nebula/examples/connector/NebulaSparkReaderExample.scala
- 把如下的代码粘贴进去,这里边我们对前边加载的图:
basketballplayer上做了顶点和边的读操作:分别调用readVertex和readEdges。
package com.vesoft.nebula.examples.connector

import com.facebook.thrift.protocol.TCompactProtocol
import com.vesoft.nebula.connector.connector.NebulaDataFrameReader
import com.vesoft.nebula.connector.{NebulaConnectionConfig, ReadNebulaConfig}
import org.apache.spark.SparkConf
import org.apache.spark.sql.SparkSession
import org.slf4j.LoggerFactory

object NebulaSparkReaderExample {

  private val LOG = LoggerFactory.getLogger(this.getClass)

  def main(args: Array[String]): Unit = {

    val sparkConf = new SparkConf
    sparkConf
      .set("spark.serializer", "org.apache.spark.serializer.KryoSerializer")
      .registerKryoClasses(Array[Class[_]](classOf[TCompactProtocol]))
    val spark = SparkSession
      .builder()
      .master("local")
      .config(sparkConf)
      .getOrCreate()

    readVertex(spark)
    readEdges(spark)

    spark.close()
    sys.exit()
  }

  def readVertex(spark: SparkSession): Unit = {
    LOG.info("start to read nebula vertices")
    val config =
      NebulaConnectionConfig
        .builder()
        .withMetaAddress("metad0:9559,metad1:9559,metad2:9559")
        .withConenctionRetry(2)
        .build()
    val nebulaReadVertexConfig: ReadNebulaConfig = ReadNebulaConfig
      .builder()
      .withSpace("basketballplayer")
      .withLabel("player")
      .withNoColumn(false)
      .withReturnCols(List("name", "age"))
      .withLimit(10)
      .withPartitionNum(10)
      .build()
    val vertex = spark.read.nebula(config, nebulaReadVertexConfig).loadVerticesToDF()
    vertex.printSchema()
    vertex.show(20)
    println("vertex count: " + vertex.count())
  }

  def readEdges(spark: SparkSession): Unit = {
    LOG.info("start to read nebula edges")

    val config =
      NebulaConnectionConfig
        .builder()
        .withMetaAddress("metad0:9559,metad1:9559,metad2:9559")
        .withTimeout(6000)
        .withConenctionRetry(2)
        .build()
    val nebulaReadEdgeConfig: ReadNebulaConfig = ReadNebulaConfig
      .builder()
      .withSpace("basketballplayer")
      .withLabel("follow")
      .withNoColumn(false)
      .withReturnCols(List("degree"))
      .withLimit(10)
      .withPartitionNum(10)
      .build()
    val edge = spark.read.nebula(config, nebulaReadEdgeConfig).loadEdgesToDF()
    edge.printSchema()
    edge.show(20)
    println("edge count: " + edge.count())
  }

}
- 然后打包成 JAR 包
/usr/lib/mvn/bin/mvn install -Dgpg.skip -Dmaven.javadoc.skip=true -Dmaven.test.skip=true
- 最后,把它提交到 Spark 里执行:
cd example

/spark/bin/spark-submit --master "local" \
    --class com.vesoft.nebula.examples.connector.NebulaSparkReaderExample \
    --driver-memory 4g target/example-3.0-SNAPSHOT.jar

# 退出 spark 容器
exit
- 成功之后,我们会得到返回结果:
22/04/19 07:29:34 INFO DAGScheduler: Job 1 finished: show at NebulaSparkReaderExample.scala:57, took 0.199310 s
+---------+------------------+---+
|_vertexId|              name|age|
+---------+------------------+---+
|player105|       Danny Green| 31|
|player109|    Tiago Splitter| 34|
|player111|        David West| 38|
|player118| Russell Westbrook| 30|
|player143|Kristaps Porzingis| 23|
|player114|     Tracy McGrady| 39|
|player150|       Luka Doncic| 20|
|player103|          Rudy Gay| 32|
|player113|   Dejounte Murray| 29|
|player121|        Chris Paul| 33|
|player128|   Carmelo Anthony| 34|
|player130|       Joel Embiid| 25|
|player136|        Steve Nash| 45|
|player108|        Boris Diaw| 36|
|player122|    DeAndre Jordan| 30|
|player123|       Ricky Rubio| 28|
|player139|        Marc Gasol| 34|
|player142|     Klay Thompson| 29|
|player145|      JaVale McGee| 31|
|player102| LaMarcus Aldridge| 33|
+---------+------------------+---+
only showing top 20 rows

22/04/19 07:29:36 INFO DAGScheduler: Job 4 finished: show at NebulaSparkReaderExample.scala:82, took 0.135543 s
+---------+---------+-----+------+
|   _srcId|   _dstId|_rank|degree|
+---------+---------+-----+------+
|player105|player100|    0|    70|
|player105|player104|    0|    83|
|player105|player116|    0|    80|
|player109|player100|    0|    80|
|player109|player125|    0|    90|
|player118|player120|    0|    90|
|player118|player131|    0|    90|
|player143|player150|    0|    90|
|player114|player103|    0|    90|
|player114|player115|    0|    90|
|player114|player140|    0|    90|
|player150|player120|    0|    80|
|player150|player137|    0|    90|
|player150|player143|    0|    90|
|player103|player102|    0|    70|
|player113|player100|    0|    99|
|player113|player101|    0|    99|
|player113|player104|    0|    99|
|player113|player105|    0|    99|
|player113|player106|    0|    99|
+---------+---------+-----+------+
only showing top 20 rows
事实上,在这个代码仓库下还有更多的例子,特别是 GraphX 的例子,你可以尝试自己去探索这部分。
请注意,在 GraphX 假定顶点 ID 是数字类型的,因此对于字符串类型的顶点 ID 情况,需要进行实时转换,请参考 Nebula Algorithom 中的例子,了解如何绕过这一问题。
Nebula Exchange
- 代码:https://github.com/vesoft-inc/nebula-exchange/
- 文档:https://docs.nebula-graph.com.cn/3.1.0/nebula-exchange/about-exchange/ex-ug-what-is-exchange/
- JAR 包:https://github.com/vesoft-inc/nebula-exchange/releases
- 配置例子: exchange-common/src/test/resources/application.conf
Nebula Exchange 是一个 Spark Lib,也是一个可以直接提交执行的 Spark 应用,它被用来从多个数据源读取数据写入 NebulaGraph 或者输出 NebulaGraph SST 文件。
通过 spark-submit 的方式使用 Nebula Exchange 的方法很直接:
- 首先创建配置文件,让 Exchange 知道应该如何获取和写入数据
- 然后用指定的配置文件调用 Exchange 包
现在,让我们用上一章中创建的相同环境做一个实际测试。
一键试玩 Exchange
先跑起来看看吧
请参考前边拉起环境这一章节,先一键装好环境。
一键执行:
~/.nebula-up/nebula-exchange-example.sh
恭喜你,已经第一次执行成功一个 Exchange 的数据导入任务啦!
再看看一些细节
这个例子里,我们实际上是用 Exchange 从 CSV 文件这一其中支持的数据源中读取数据写入 NebulaGraph 集群的。这个 CSV 文件中第一列是顶点 ID,第二和第三列是 "姓名 "和 "年龄 "的属性:
player800,"Foo Bar",23
player801,"Another Name",21
- 咱们可以进到 Spark 环境里看看
docker exec -it spark_master_1 bash
cd /root
- 可以看到我们提交 Exchange 任务时候指定的配置文件
exchange.conf它是一个HOCON格式的文件:- 在
.nebula中描述了 NebulaGraph 集群的相关信息 - 在
.tags中描述了如何将必填字段对应到我们的数据源(这里是 CSV 文件)等有关 Vertecies 的信息。
- 在
{
  # Spark relation config
  spark: {
    app: {
      name: Nebula Exchange
    }

    master:local

    driver: {
      cores: 1
      maxResultSize: 1G
    }

    executor: {
        memory: 1G
    }

    cores:{
      max: 16
    }
  }

  # NebulaGraph relation config
  nebula: {
    address:{
      graph:["graphd:9669"]
      meta:["metad0:9559", "metad1:9559", "metad2:9559"]
    }
    user: root
    pswd: nebula
    space: basketballplayer

    # parameters for SST import, not required
    path:{
        local:"/tmp"
        remote:"/sst"
        hdfs.namenode: "hdfs://localhost:9000"
    }

    # nebula client connection parameters
    connection {
      # socket connect & execute timeout, unit: millisecond
      timeout: 30000
    }

    error: {
      # max number of failures, if the number of failures is bigger than max, then exit the application.
      max: 32
      # failed import job will be recorded in output path
      output: /tmp/errors
    }

    # use google's RateLimiter to limit the requests send to NebulaGraph
    rate: {
      # the stable throughput of RateLimiter
      limit: 1024
      # Acquires a permit from RateLimiter, unit: MILLISECONDS
      # if it can't be obtained within the specified timeout, then give up the request.
      timeout: 1000
    }
  }

  # Processing tags
  # There are tag config examples for different dataSources.
  tags: [

    # HDFS csv
    # Import mode is client, just change type.sink to sst if you want to use client import mode.
    {
      name: player
      type: {
        source: csv
        sink: client
      }
      path: "file:///root/player.csv"
      # if your csv file has no header, then use _c0,_c1,_c2,.. to indicate fields
      fields: [_c1, _c2]
      nebula.fields: [name, age]
      vertex: {
        field:_c0
      }
      separator: ","
      header: false
      batch: 256
      partition: 32
    }

  ]
}
- 我们应该能看到那个 CSV 数据源和这个配置文件都在同一个目录下了:
bash-5.0# ls -l
total 24
drwxrwxr-x    2 1000     1000          4096 Jun  1 04:26 download
-rw-rw-r--    1 1000     1000          1908 Jun  1 04:23 exchange.conf
-rw-rw-r--    1 1000     1000          2593 Jun  1 04:23 hadoop.env
drwxrwxr-x    7 1000     1000          4096 Jun  6 03:27 nebula-spark-connector
-rw-rw-r--    1 1000     1000            51 Jun  1 04:23 player.csv
- 然后,实际上我们可以手动再次提交一下这个 Exchange 任务
/spark/bin/spark-submit --master local \
    --class com.vesoft.nebula.exchange.Exchange download/nebula-exchange.jar \
    -c exchange.conf
- 部分返回结果
22/06/06 03:56:26 INFO Exchange$: Processing Tag player
22/06/06 03:56:26 INFO Exchange$: field keys: _c1, _c2
22/06/06 03:56:26 INFO Exchange$: nebula keys: name, age
22/06/06 03:56:26 INFO Exchange$: Loading CSV files from file:///root/player.csv
...
22/06/06 03:56:41 INFO Exchange$: import for tag player cost time: 3.35 s
22/06/06 03:56:41 INFO Exchange$: Client-Import: batchSuccess.player: 2
22/06/06 03:56:41 INFO Exchange$: Client-Import: batchFailure.player: 0
...
更多的数据源,请参考文档和配置的例子。
关于 Exchange 输出 SST 文件的实践,你可以参考文档和我的旧文 Nebula Exchange SST 2.x实践指南。
Nebula Algorithm
- 代码仓库: https://github.com/vesoft-inc/nebula-algorithm
- 文档:https://docs.nebula-graph.com.cn/3.1.0/nebula-algorithm/
- JAR 包:https://repo1.maven.org/maven2/com/vesoft/nebula-algorithm/
- 示例代码:example/src/main/scala/com/vesoft/nebula/algorithm
通过 spark-submit 提交任务
我在这个代码仓库里给出了例子,今天我们借助 Nebula-UP 可以更方便体验它。
参考前边拉起环境这一章节,先一键装好环境。
在如上通过 Nebula-UP 的 Spark 模式部署了需要的依赖之后
- 加载 LiveJournal 数据集
~/.nebula-up/load-LiveJournal-dataset.sh
- 在 LiveJournal 数据集上执行一个 PageRank 算法,结果输出到 CSV 文件中
~/.nebula-up/nebula-algo-pagerank-example.sh
- 检查输出结果:
docker exec -it spark_master_1 bash

head /output/part*000.csv
_id,pagerank
637100,0.9268620883822242
108150,1.1855749056722755
957460,0.923720299211093
257320,0.9967932799358413
配置文件解读
完整文件在这里,这里,我们介绍一下主要的字段:
.data指定了源是 Nebula,表示从集群获取图数据,输出sink是csv,表示写到本地文件里。
  data: {
    # data source. optional of nebula,csv,json
    source: nebula
    # data sink, means the algorithm result will be write into this sink. optional of nebula,csv,text
    sink: csv
    # if your algorithm needs weight
    hasWeight: false
  }
.nebula.read规定了读 NebulaGraph 集群的对应关系,这里是读取所有 edge type:follow的边数据为一整张图
  nebula: {
    # algo's data source from Nebula. If data.source is nebula, then this nebula.read config can be valid.
    read: {
        # Nebula metad server address, multiple addresses are split by English comma
        metaAddress: "metad0:9559"
        # Nebula space
        space: livejournal
        # Nebula edge types, multiple labels means that data from multiple edges will union together
        labels: ["follow"]
        # Nebula edge property name for each edge type, this property will be as weight col for algorithm.
        # Make sure the weightCols are corresponding to labels.
        weightCols: []
    }
.algorithm里配置了我们要调用的算法,和算法的配置
  algorithm: {
    executeAlgo: pagerank

    # PageRank parameter
    pagerank: {
        maxIter: 10
        resetProb: 0.15  # default 0.15
    }
作为一个库在 Spark 中调用 Nebula Algoritm
请注意另一方面,我们可以将 Nebula Algoritm 作为一个库调用,它的好处在于:
对算法的输出格式有更多的控制/定制功能
可以对非数字 ID 的情况进行转换,见这里
这里我先不给出例子了,如果大家感兴趣可以给 Nebula-UP 提需求,我也会增加相应的例子。
交流图数据库技术?加入 Nebula 交流群请先填写下你的 Nebula 名片,Nebula 小助手会拉你进群~~